Learn how to make challah bread recipes with this easy step-by-step tutorial. Make 3, 4, and 6 strands of braided challah in a simple and easy method. Be sure to check out the recipe video for 6 strands of braided challah.
Crisp from the outside, soft and fluffy from inside. This challah bread recipes is the only recipe you will ever need. Blog post includes pro tips and instructions on how to make ahead dough, how to freeze dough and how to use leftover challah bread recipes.
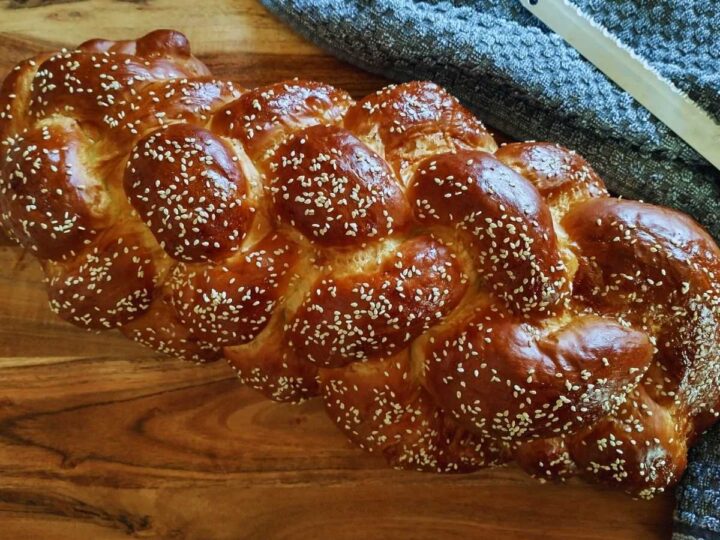
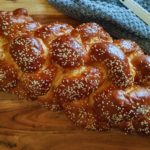
It is pretty easy to make challah and you don't need any fancy equipment to make this bread. The best part of making challah lies in the braiding of the loaf. Even a three-stranded braid gives this challah a magnificent look, but you can go with a four- or six-stranded braid. Challah can be rolled in a circle instead of shaped like a loaf for a more festive look.
I love baking. It acts as a therapeutic for me. It's very rewarding to see your creations come out of the oven. It's hard to beat freshly baked goods - they're so satisfying!
I just had to share this Challah bread recipes with you all. Many of my readers tried my Star Bread recipe and loved it. They found instructions easy to follow and the star bread turned out incredible! I thought this challah bread recipes would be a perfect addition to my holiday recipe collection.
This recipe for Challah bread recipes is quite simple, the only challenging part here is the braiding challah. I have shared a recipe video, where I have demonstrated how to braid a six-strand bread. This simple technique works for 3, and 4 strands of bread as well. Follow this simple method and you will be amazed how easy it is to braid challah.
Table of contents
Challah
Challah is a special bread of Jewish origin. Typically, challah is served at ceremonial occasions such as Shabbat, Rosh Hashanah, and major Jewish holidays (other than Passover).
Challah is an enriched yeast dough bread similar to brioche. Challah is made from eggs, flour, yeast, water, oil (usually vegetable or canola oil), and salt. It is pale yellow in color and rich in flavor. Challah sometimes contains raisins and/or saffron.
Poppy seeds, sesame seeds, and anise may be added to the dough or sprinkled on top. Challah can be made without eggs, known as water Challah. The water Challah has a texture like a French baguette.
Ingredients for Challah Recipe
- Flour: All-purpose flour is used for challah recipes.
- Water: Provides hydration to the dough.
- Yeast: Acts as a leavening agent, and helps the dough to rise.
- Eggs: Adds richness, flavor, and a golden color to the bread.
- Neutral oil: Vegetable oil or Canola oil.
- Sugar or Honey: Provides sweetness and aids in yeast activation.
- Salt: Enhances the flavor and controls the fermentation process.
- (Optional) Sesame seeds:
How to make Challah Bread
Sharing this easy and foolproof recipe to make Challah bread recipes at home effortlessly! I have shared a recipe video and step-by-step instructions on how to braid 4 strands and 6 strands of challah. Follow my easy, technique for braiding the bread and make a perfect loaf of Challah!
Activating the Yeast
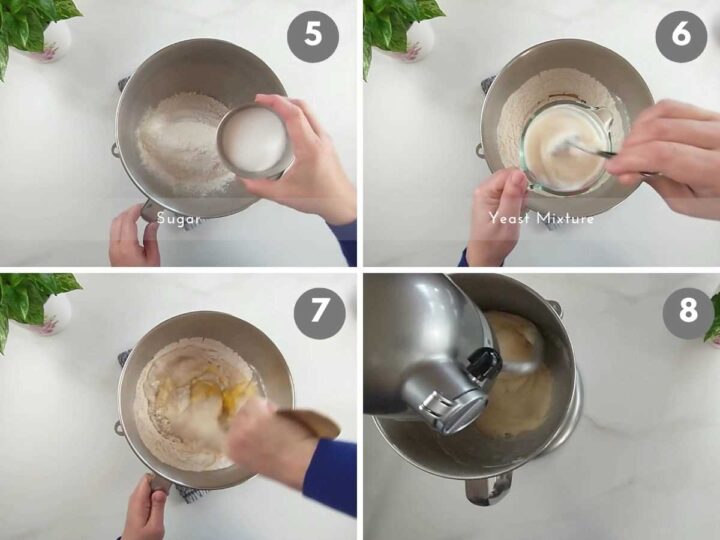
In a cup, stir in 1 cup of lukewarm water or milk [100F – 110 F], a teaspoon of sugar, and yeast. Let the mixture stand for 10 minutes, or it turns frothy and doubles in volume.
Note: If the yeast is active, the mixture turns frothy, and doubles in volume. If the mixture does not double in size, start the process again with fresh yeast.

Knead the Dough
- In a bowl, add flour, sugar, salt, oil, yeast mixture, and eggs. Mix with a spatula until all the flour is incorporated.
- Transfer the dough to a lightly floured work surface and knead it for around 15-20 minutes. The dough will be soft, elastic, and spring back when pressed.
- If using a stand mixer, knead the dough for 5 minutes. Note: If the dough is sticky, add some flour. If it's dry, add 1-2 teaspoons of lukewarm water.
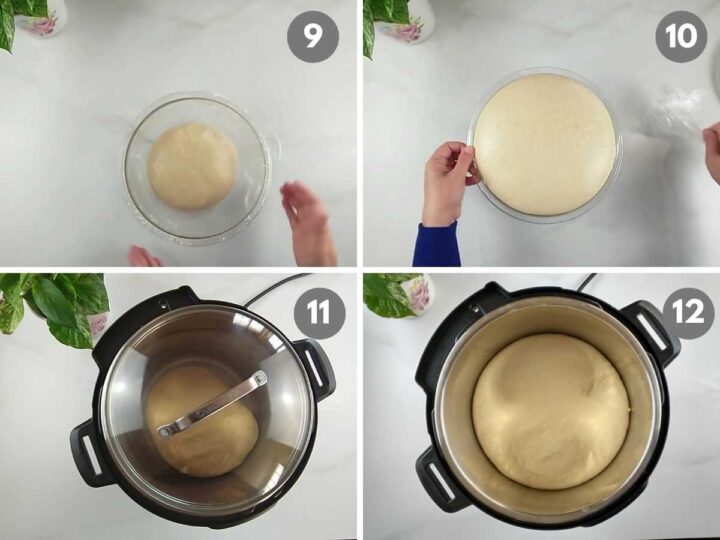
- Shape the dough into a ball and place it in a greased bowl.
First Rise
- Traditional Method
- In a greased bowl, place the dough and turn it to grease it on top.
- Cover the bowl with a kitchen towel. Place the dough in a warm place for 1 ½ to 2 hours or until it doubles in volume.
- Using an Instant Pot
- In an Instant Pot, place the dough in the greased inner pot and turn it once to grease the top.
- Place the lid, and cover the pot. Turn ON YOGURT (normal) for 1 hour. Note: I used a glass lid that fits, to cover the inner pot.
Shaping & Braiding Techniques
Be sure to check out the recipe video - how to braid 6 strands of challah. This recipe makes 1- 24 inch loaf or 2 - 12 inch loaves. To make a 1 -24 inch loaf, divide the dough into 6 equal pieces. For 12-inch loaves, divide the dough into two pieces of equal size, then each piece into six pieces. Follow the recipe as discussed below:
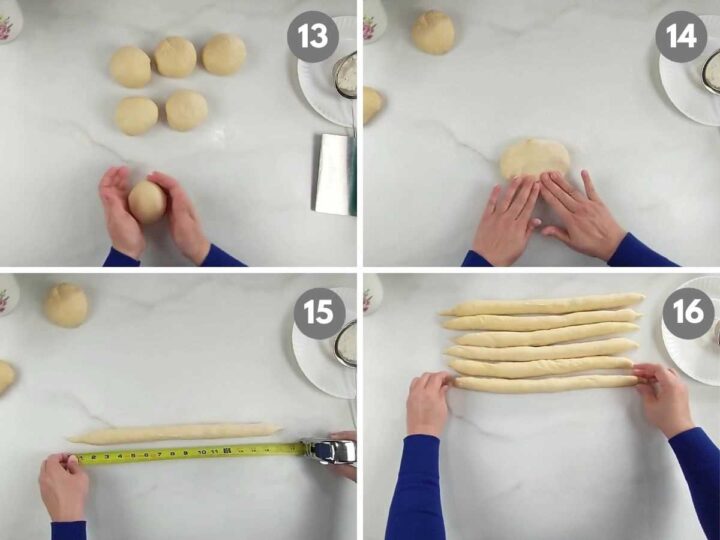
- Transfer the dough onto a work surface, and punch it down. Depending upon the type of the braid, divide the dough into 3, 4, or 6 equal pieces. Shape each piece into a smooth ball. Cover the dough balls with a clean kitchen towel, and let them rest for 10 minutes.
- Take one portion of the dough ball and roll it into a long rope about 16 inches long. Note: If the ropes shrink, allow them to rest for 5 minutes, then try rolling them again.
- Three-Strand Braid: This is the most common and straightforward braiding style for challah. It creates a classic, woven appearance. Here's how to do it:
- Place the 3 ropes parallel to each other and pinch the top of the ropes together. Slightly dust the ropes with some flour to prevent them from sticking.
- Braid the ropes together like braiding hair. At the end of braiding, pinch the ends of the ropes together.
- Four-Strand Braid: The four-strand braid adds an extra level of intricacy to the appearance of the challah. Here's how to do it:
- Place the 4 ropes parallel to each other and pinch the top of the ropes together. Slightly dust the ropes with some flour to prevent them from sticking.
- Repeat the following steps until you reach the end of the bread.
- Make 2 sets of ropes. Each set of ropes, has 2 ropes, rope 1 (inner rope) and rope 2 (router rope).
- Begin with the rightmost set of ropes, then the leftmost.
- [Right]: Place rope 1 (inner rope) to the far left, and rope 2 (outer rope) in the middle of the set.
- [Left]: Place rope 1 (inner rope) to the far right, and rope 2 (outer rope) in the middle of the set.
- Repeat steps 1, 2, and 3 with the remaining loaf. At the end of braiding, pinch the ends of the ropes together and push that edge underneath the loaf.
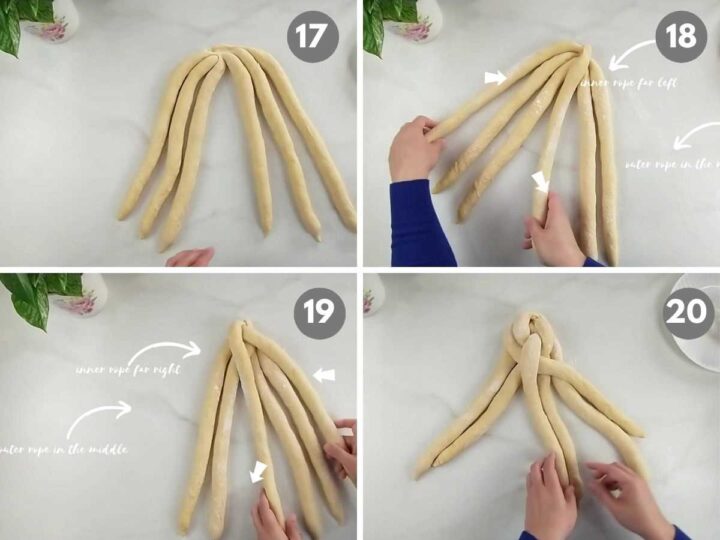
- Six-Strand Braid: The six-strand braid is an advanced braiding technique that creates an intricate and visually stunning challah. Here's how to do it:
- Please watch the video on how to braid 6 strand challah?
- Place the 6 ropes parallel to each other and pinch the top of the ropes together. Slightly dust the ropes with some flour to prevent them from sticking.
- Repeat the following steps until you reach the end of the bread.
- Make 3 sets of ropes. Each set of ropes, has 2 ropes, rope 1 (inner rope) and rope 2 (outer rope).
- Begin with the rightmost set of ropes, then the leftmost.
- [Right]: Place rope 1 (inner rope) to the far left, and rope 2 (outer rope) in the middle of the two sets.
- [Left]: Place rope 1 (inner rope) to the far right, and rope 2 (outer rope) in the middle of the two sets.
- Repeat steps 1, 2, 3 with the remaining loaf. At the end of braiding, pinch the ends of the ropes together and push that edge underneath the loaf
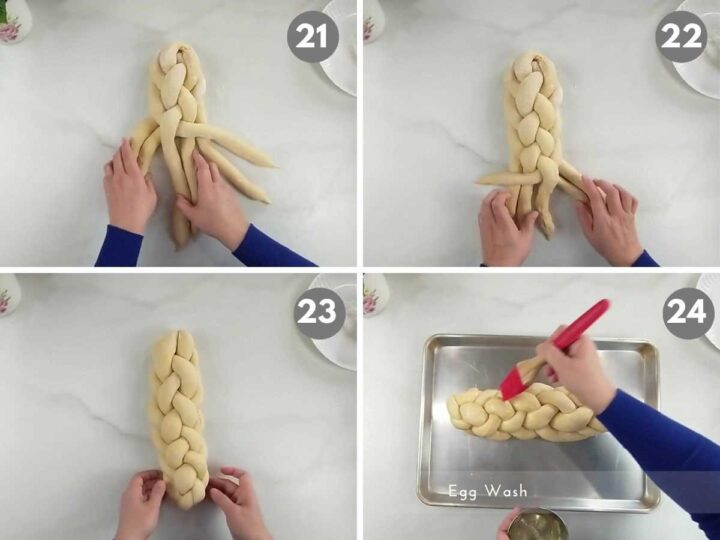
Second Rise
- Line a baking sheet with parchment paper. Place the braided challah onto the baking sheet.
- Using a pastry brush, brush the challah with an egg wash. Make sure to reach the cracks and sides of the loaf.
- Place the bread in an oven that’s turned OFF. Turn ON the oven light. Let it rise for 2 hours. Every 40 minutes brush it with egg wash.
- Alternatively, place it in a warm place for 2 hours or until it doubles in volume.
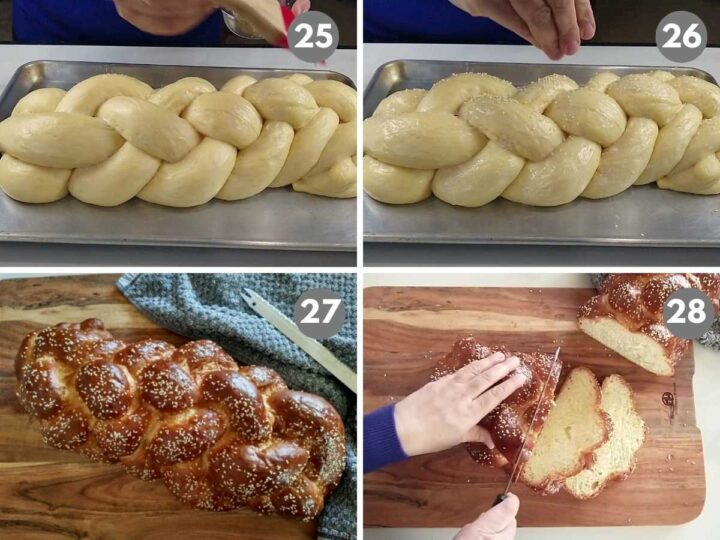
Bake Challah
- Preheat the oven to 350°F.
- Using a pastry brush, again brush the challah with an egg wash. Make sure to reach the cracks and sides of the loaf.
- [Optional] Sprinkle the top with some sesame seeds.
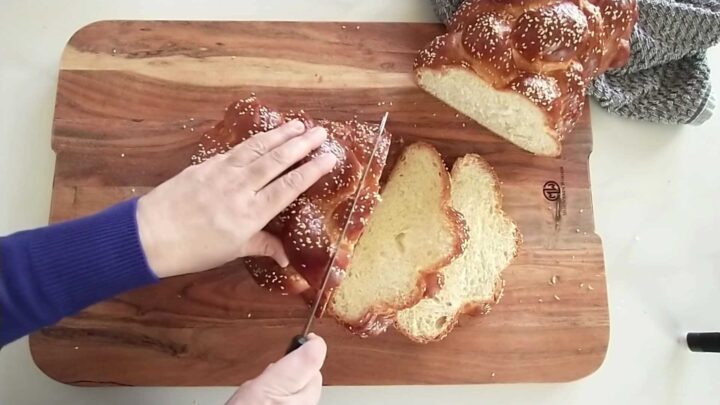
- Place the challah in the center rack. Bake it for 30 to 35 minutes, or until the top is golden brown and an instant-read thermometer reads 190°F in the center. Note: If the top is browning quickly, loosely tent the bread with the foil.
- Remove the Challah from the oven and brush with some melted butter. Allow it to slightly cool on a cooling rack. Serve a warm slice of Challah.
Directions for Make-Ahead Dough
Follow steps 1 & step 2 and prepare the dough. Place the dough in a lightly greased, air-tight container and place it in the refrigerator. The dough will rise slowly overnight in the refrigerator. In the morning, remove the dough and let it sit at room temperature for around 30 minutes or until it doubles in volume. Continue with step 4.
Directions to Freeze the Dough
Follow the challah bread recipes through step 3. After first proofing, deflate the dough. Wrap the dough first in plastic wrap, followed by a foil. Place it in a freezer-safe, Ziploc bag and freeze it for up to 3 months. Thaw overnight in the refrigerator, or on a kitchen counter. Continue with step 4.
Serving Suggestions
Challah can be enjoyed plain, sliced it up, and serve warm. Some other ways to serve challah are:
- Honey or Jam: Drizzle a bit of honey or top it up with some fresh jam. I like to serve it with some homemade Strawberry Jam.
- French toast: My kids love the sweet, cinnamon raisins toast, while my husband is a huge fan of savory Indian-style masala toast. Either way, it tastes great!
- Toasted or Sandwich: Slice up Challah, and slightly toast the bread. Enjoy with some fresh homemade butter or make a sandwich.
- Bread Pudding: A great way to use leftover challah, which is going a bit stale. Turn it into a classic bread pudding.
- Croutons: Use leftover challah to make homemade croutons.
- Sandwiches: Mushroom bell pepper panini, egg sandwich, and grilled chicken sandwiches with challah are my personal favorites. Nothing beats homemade bread!
Leftovers & Storage
- If there are leftovers, wrap the remaining challah tightly in plastic wrap or place it in a resealable bag to maintain freshness.
- Store the challah at room temperature for up to 2-3 days. After that, you can freeze it for longer storage.
- To freeze challah, wrap it tightly in plastic wrap and place it in a freezer bag or container. It can be stored in the freezer for up to 3 months.
- When ready to use frozen challah, allow it to thaw at room temperature. You can also reheat it in a preheated oven for a few minutes to refresh it before serving.

Tips for Irresistible Challah
- If the yeast is active, the mixture turns frothy and doubles in volume. If the mixture does not double in size, start the process again with fresh yeast.
- Check the consistency of the dough after kneading it for 4-5 minutes. If it feels sticky, add some flour, and if it's dry, add 1-2 teaspoons of lukewarm water. Knead the dough to a soft ball.
- Do not over-knead the dough. The dough should be soft, and elastic, spring back when pressed, and not sticky.
- If using the oven to proof the dough, turn on the oven light. Do not turn on the oven.
- Proof the dough until double in volume.
- The secret to a glossy loaf is to brush with an egg wash. Every 40 minutes brush the bread, twice during second rise, and once before baking.
Challah Variations & Adaptations
Challah is a versatile bread that can be customized and adapted to suit different tastes and dietary preferences. Here are some variations and adaptations you can explore:
- Whole Wheat Challah: Replace a portion or all of the all-purpose flour with whole wheat flour for a nuttier flavor and increased nutritional value. Adjust the liquid content as needed, as whole wheat flour absorbs more moisture.
- Flavored Challah: Add various flavorings to the dough, such as cinnamon, cardamom, orange zest, or vanilla extract, to give your challah a unique taste.
- Sweet Challah: Increase the amount of sugar or honey in the dough to create a sweeter challah. You can also sprinkle the braided challah with cinnamon-sugar before baking for an extra touch of sweetness.
- Savory Challah: Incorporate savory ingredients into the dough, such as herbs (e.g., rosemary, thyme, or dill) or grated cheese, to make a delicious savory challah. It pairs well with soups, stews, or as a base for sandwiches.
- Seeded Challah: Enhance the appearance and flavor by incorporating seeds into the dough or sprinkling them on top before baking. Popular options include sesame seeds, poppy seeds, sunflower seeds, or a mix of different seeds.
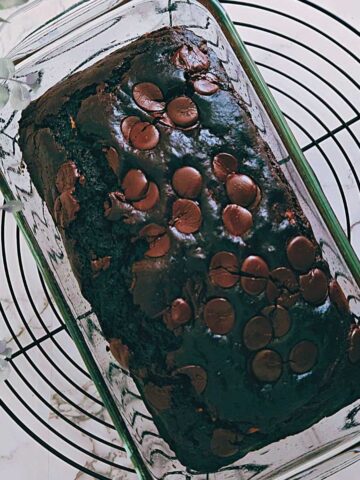
- Stuffed Challah: Get creative by adding fillings to the challah. You can roll the dough around ingredients like chocolate chips, raisins, dried fruits, or even savory fillings like cheese and spinach. Ensure the fillings are well-sealed to prevent leakage during baking.
- Mini Challah Rolls: Instead of making a large loaf, portion the dough into smaller balls and shape them into individual rolls. This is great for serving at brunches, gatherings, or as a fun twist on traditional challah.
Frequently Asked Questions
Challah is different from bread due to its enriched dough, including ingredients like eggs and sugar, as well as its traditional braided shape, making it a symbolically significant and uniquely textured bread.
Challah bread is special due to its enriched dough made with eggs and sweeteners, giving it a rich and slightly sweet flavor. Its braided shape and cultural significance in Jewish traditions add to its uniqueness, making it a cherished and symbolic bread.
The best flour for challah is typically all-purpose flour, which provides a good balance of protein and gluten for achieving the desired texture and structure.
For a nice, soft, and fluffy bread, it is important to knead the dough well. If the dough is not kneaded enough, it will lack strength. The bread turns out chewy and quite dense in texture.
Well-baked challah will have a golden brown top and the center of the loaf reads 190°F on an instant-read thermometer.
The bread smells yeasty if it's under-baked. Make sure the top is golden brown and the center of the bread reaches 190°F on an instant-read thermometer.
TRIED THIS RECIPE?
Hope you enjoy this Challah bread recipe!! If you give this recipe a try, please rate the recipe by clicking the stars on the recipe card. Leave a comment and share your experience. Thank you!
Follow me on Facebook, Pinterest, and Instagram for all the latest on my blog!! Subscribe to my Youtube Channel for easy and delicious video recipes. Happy Cooking!!
More Bread Recipes
- Homemade English Muffins
- Brioche Rolls
- Homemade Whole Wheat Bread
- Homemade Bread Bowls
- Easy Garlic Knots
- New York Style Bagels
- Homemade Pizza from scratch
- Honey Oat Bread
- Chocolate Babka-post includes 16 different sweet and savory filling ideas
Easy Challah Bread Recipe – How To Make Challah Bread
Equipment
Ingredients
Ingredients for Challah Recipe
- 4 ½ cups (550 g) all-purpose flour
- 1 cup (236 ml) lukewarm water [100*F – 110* F]
- 2 ¼ teaspoon (7g) Active Dry Yeast
- ¼ cup (50 g) granulated sugar or pure honey
- 2 large eggs plus 1 large egg yolk [reserve 1 large egg white for brushing]
- 1 teaspoon salt
- ¼ cup (59 ml) neutral-flavored oil; vegetable oil or canola oil
- 1 tablespoon sesame seeds [Optional]
FOR EGG WASH
- 1 reserved egg white plus 1 tablespoon (15ml) water
Instructions
How to make Challah Bread
Step 1: Activating the Yeast
- In a cup, stir in 1 cup of lukewarm water or milk [100*F – 110* F], a teaspoon of sugar, and yeast. Let the mixture stand for 10 minutes, or it turns frothy and doubles in volume. Note: If the yeast is active, the mixture turns frothy, and doubles in volume. If the mixture does not double in size, start the process again with fresh yeast.
Step 2: Knead the Dough
- In a bowl, add flour, sugar, salt, oil, yeast mixture, and eggs. Mix with a spatula until all the flour is incorporated.
- Transfer the dough to a lightly floured work surface and knead it for around 15-20 minutes. The dough will be soft, elastic, and spring back when pressed.
- If using a stand mixer, knead the dough for 5 minutes. Note: If the dough is sticky, add some flour. If it’s dry, add 1-2 teaspoons of lukewarm water.
- Shape the dough into a ball and place it in a greased bowl.
Step 3: First Rise [Traditional or Instant Pot]
- In a greased bowl, place the dough and turn it to grease it on top.
- Cover the bowl with a kitchen towel. Place the dough in a warm place for 1 ½ to 2 hours or until it doubles in volume.
First Rise in Instant Pot:
- In an Instant Pot, place the dough in the greased inner pot and turn it once to grease the top.
- Place the lid, and cover the pot. Turn ON YOGURT (normal) for 1 hour. Note: I used a glass lid that fits, to cover the inner pot.
Step 4: Shaping & Braiding Techniques
- Transfer the dough onto a work surface, and punch it down. Depending upon the type of the braid, divide the dough into 3 or 6 equal pieces. Shape each piece into a smooth ball. Cover the dough balls with a clean kitchen towel, and let them rest for 10 minutes.
- Take one portion of the dough ball and roll it into a long rope about 16 inches long. Note: If the ropes shrink, allow them to rest for 5 minutes, then try rolling them again.
Six-Strand Braid
- Please watch the video on how to braid 6 strand challah?
- Place the 6 ropes parallel to each other and pinch the top of the ropes together. Slightly dust the ropes with some flour to prevent them from sticking.
- Repeat the following steps until you reach the end of the bread.
- Make 3 sets of ropes. Each set of ropes, has 2 ropes, rope 1 (inner rope) and rope 2 (outer rope).
- Begin with the rightmost set of ropes, then the leftmost.
- 3: [Right]: Place rope 1 (inner rope) to the far left, and rope 2 (outer rope) in the middle of the two sets.
- 3 [Left]: Place rope 1 (inner rope) to the far right, and rope 2 (outer rope) in the middle of the two sets.
- Repeat steps 1, 2, 3 with the remaining loaf. At the end of braiding, pinch the ends of the ropes together and push that edge underneath the loaf.
Step 5: Second Rise
- Line a baking sheet with parchment paper. Place the braided challah onto the baking sheet.
- Using a pastry brush, brush the challah with an egg wash. Make sure to reach the cracks and sides of the loaf.
- Place the bread in an oven that’s turned OFF. Turn ON the oven light. Let it rise for 2 hours. Every 40 minutes brush it with egg wash.
- Alternatively, place it in a warm place for 2 hours or until it doubles in volume.
Step 6: Bake Challah
- Preheat the oven to 350°F.
- Using a pastry brush, again brush the challah with an egg wash. Make sure to reach the cracks and sides of the loaf.
- [Optional] Sprinkle the top with some sesame seeds.
- Place the challah in the center rack. Bake it for 30 to 35 minutes, or until the top is golden brown and an instant-read thermometer reads 190°F in the center.Note: If the top is browning quickly, loosely tent the bread with the foil.
- Remove the Challah from the oven and brush with some melted butter. Allow it to slightly cool on a cooling rack. Serve a warm slice of Challah.
- This recipe yields 1-16 inch loaf.
Video
Notes
- Be sure to check out the recipe video – how to braid 6 strands of challah.
- This recipe makes 1- 16 inch loaf or 2 – 8 inch loaves.
- To make a 1 -16 inch loaf, divide the dough into 6 equal pieces.
- For 8 inch loaves, divide the dough into two pieces of equal size, then each piece into six pieces. Bake at 350°F for 25-30 minutes.
- Pro Tips For Best Challah Bread
- Frequently Asked Question
- Directions For Make Ahead Dough
- Directions To Freeze The Dough
1. Make 2 sets of ropes. Each set of ropes, has 2 ropes, rope 1 (inner rope) and rope 2 (router rope). 2. Begin with the rightmost set of ropes, then the leftmost. 3 [Right]: Place rope 1 (inner rope) to the far left, and rope 2 (outer rope) in the middle of the set. 3 [Left]: Place rope 1 (inner rope) to the far right, and rope 2 (outer rope) in the middle of the set. Repeat steps 1, 2, 3 with the remaining loaf. At the end of braiding, pinch the ends of the ropes together and push that edge underneath the loaf.
Tavo says
I can't wait to make this challah bread! It is one of my favorites, thanks for the detailed explanation1
Beth says
This bread looks so delicious. I can't wait to give it a try. I love the step by step pictures. Thank you!
Claudia Lamascolo says
I just love the ingredients in this a must-try this weekend thanks we love all kinds of bread!
Dannii says
I adore this bread and I have always wanted to try making it. Thanks for all the really helpful tips.
Toni says
Thank you so much for this very detailed recipe and tutorial! It turned out really amazing!