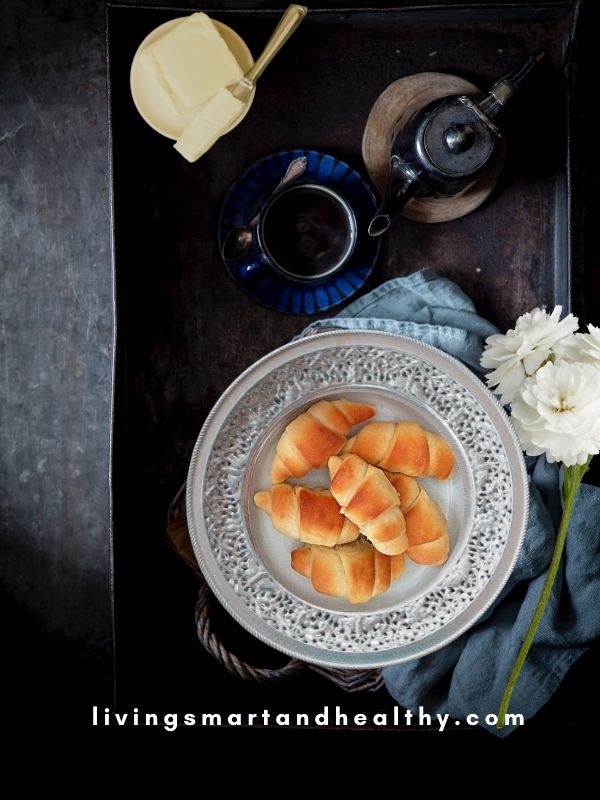
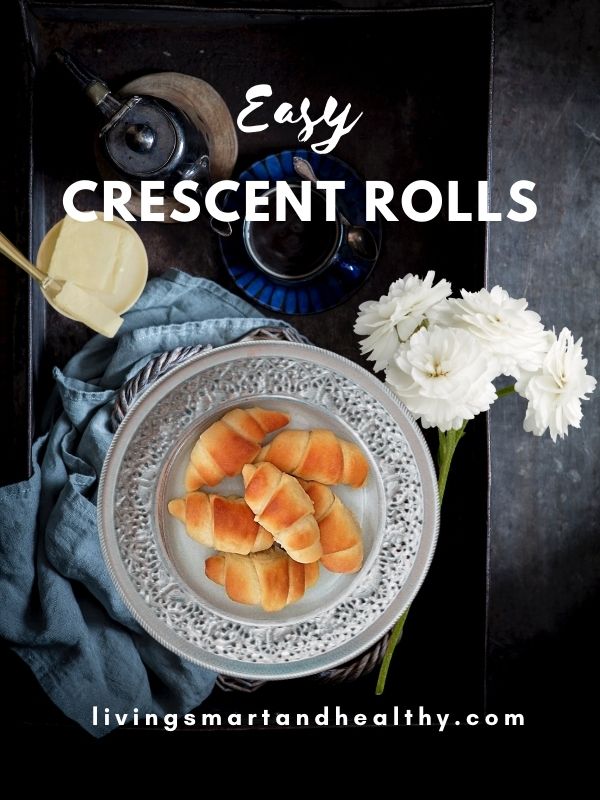
Light, soft, and fluffy homemade crescent rolls! Made with just a few simple ingredients, these dinner rolls are heavenly. Enjoy this utterly delicious dinner rolls warm out of the oven. Perfect to serve them for the holidays!
There is something about homemade bread. Homemade bread is fresh, soft, light, fluffy, and simply irresistible with extraordinary taste and flavor.
I made these crescent rolls for the holidays. OMG, these were amazing!! Seriously, nothing beats these fresh, the oven, warm, utterly delicious homemade crescent rolls.
These homemade crescent rolls are easy to make and are an absolute crowd-pleaser. I love these crescent rolls, they are incredibly delicious and you can make them ahead too.
Try these crescent rolls and, I bet they will be your favorite! Make them tonight or save the recipe for later.
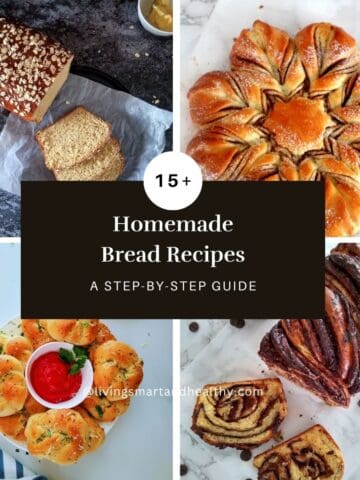
Love baking? Check out these easy homemade bread recipes from Brioche Rolls, New York Style Bagels, Honey Oat Bread, Easy Garlic Knots, and Homemade English Muffins, to more fancy, decadent bakes such as Chocolate Babka and Star Bread, we just love it.
Jump to:
- Crescent Rolls - Recipe Video
- Ingredients For Crescent Rolls Recipe
- How To Make Crescent Rolls
- Directions For Make Ahead Dough
- Directions To Freeze The Dough
- Directions For Freezing The Rolls
- Tips For Best Dinner Rolls
- Frequently Asked Questions
- How To Store The Dinner Rolls
- Enjoy Crescent Rolls With
- Crescent Rolls Recipe | Homemade Dinner Rolls
Crescent Rolls - Recipe Video
Ingredients For Crescent Rolls Recipe
4 ½ cups ( 590 g) all-purpose flour, spoon & leveled
2 ¼ teaspoon (7 g) Active Dry Yeast
⅔ cup ( 157 ml) lukewarm water [100* F – 110* F]
1 cup ( 237 ml) whole milk
¾ cup (12 tablespoons) unsalted butter, softened
⅓ (67 g) cup granulated sugar
2 teaspoon salt
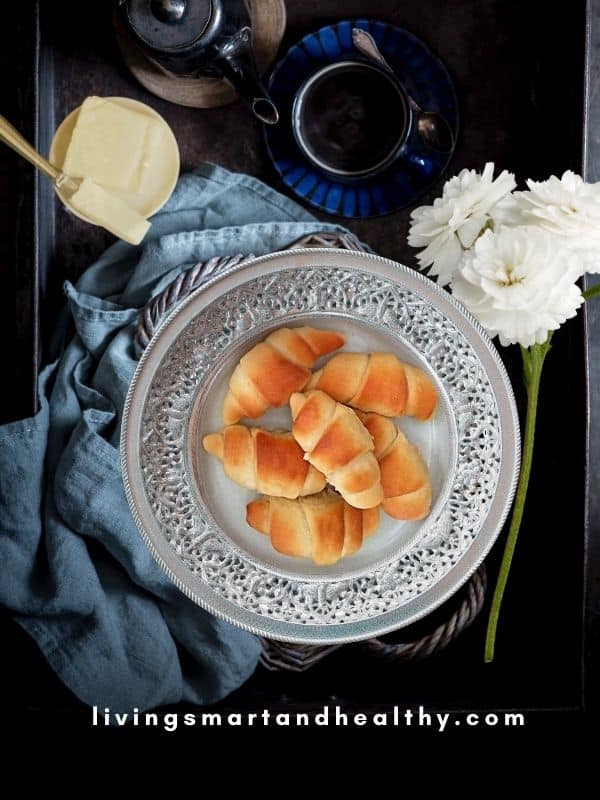
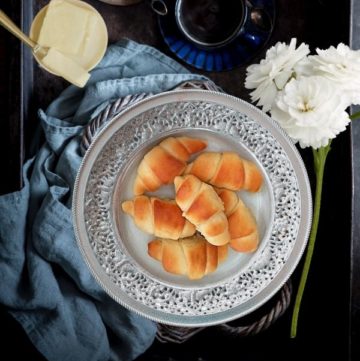
Pic Shown: Homemade Crescent Rolls
How To Make Crescent Rolls
Homemade Crescent rolls are very easy to make. Follow these simple 6 steps for making fluffy, delicious dinner rolls at home.
- Proof The Yeast
- Prepare The Dough
- First Proofing
- Shape The Rolls
- Second Proofing
- Bake
Step 1: Proof The Yeast
In a cup, stir in lukewarm water [100*F – 110*F], 1 teaspoon sugar, and yeast. Let the mixture stand for 10 minutes, or it turns frothy and doubles in volume.
Note: If the yeast is active, the mixture turns frothy, and doubles in volume. If the mixture does not double in size, start the process again with fresh yeast.
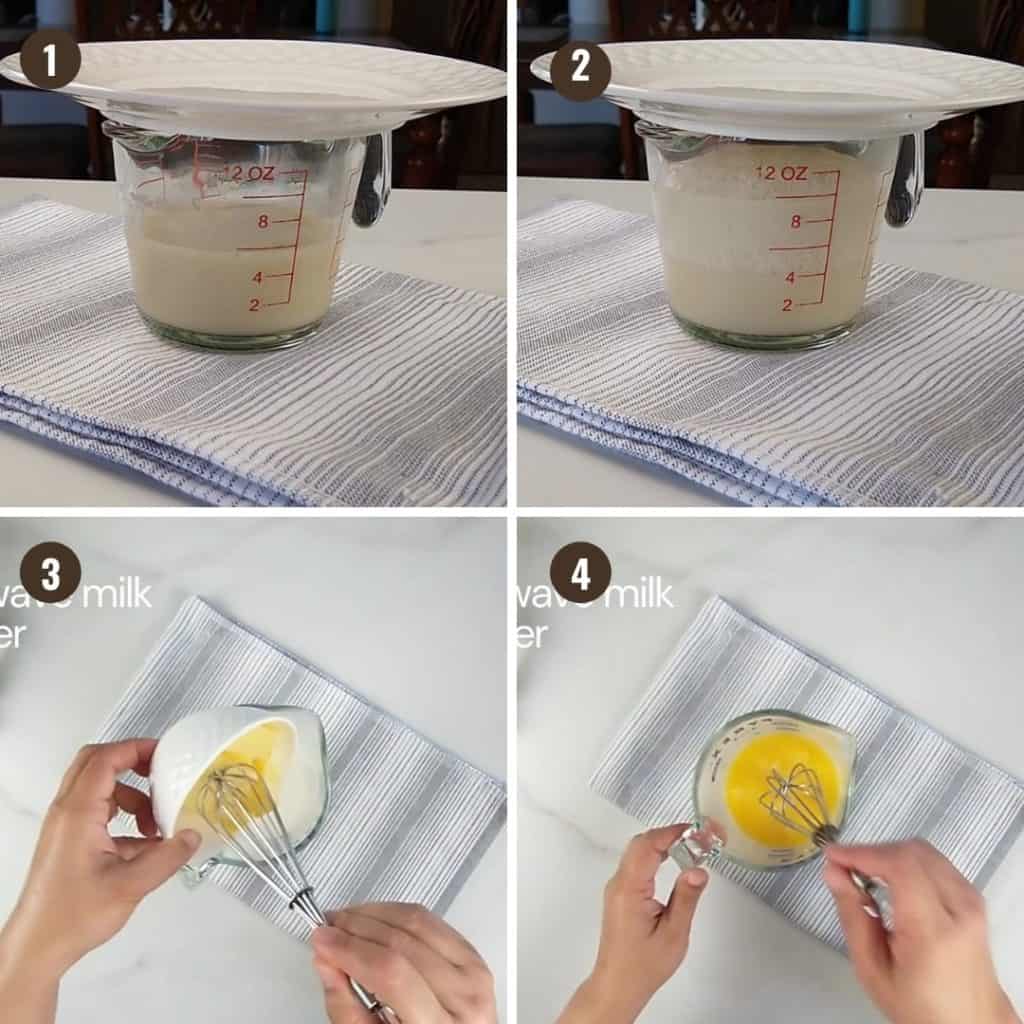
Step 2: Prepare The Dough
In a microwave-safe bowl, warm cup of milk and 6 tablespoons of butter, or the butter just melts.
Note: The temperature of the mixture should be lukewarm [100*F – 110*F].
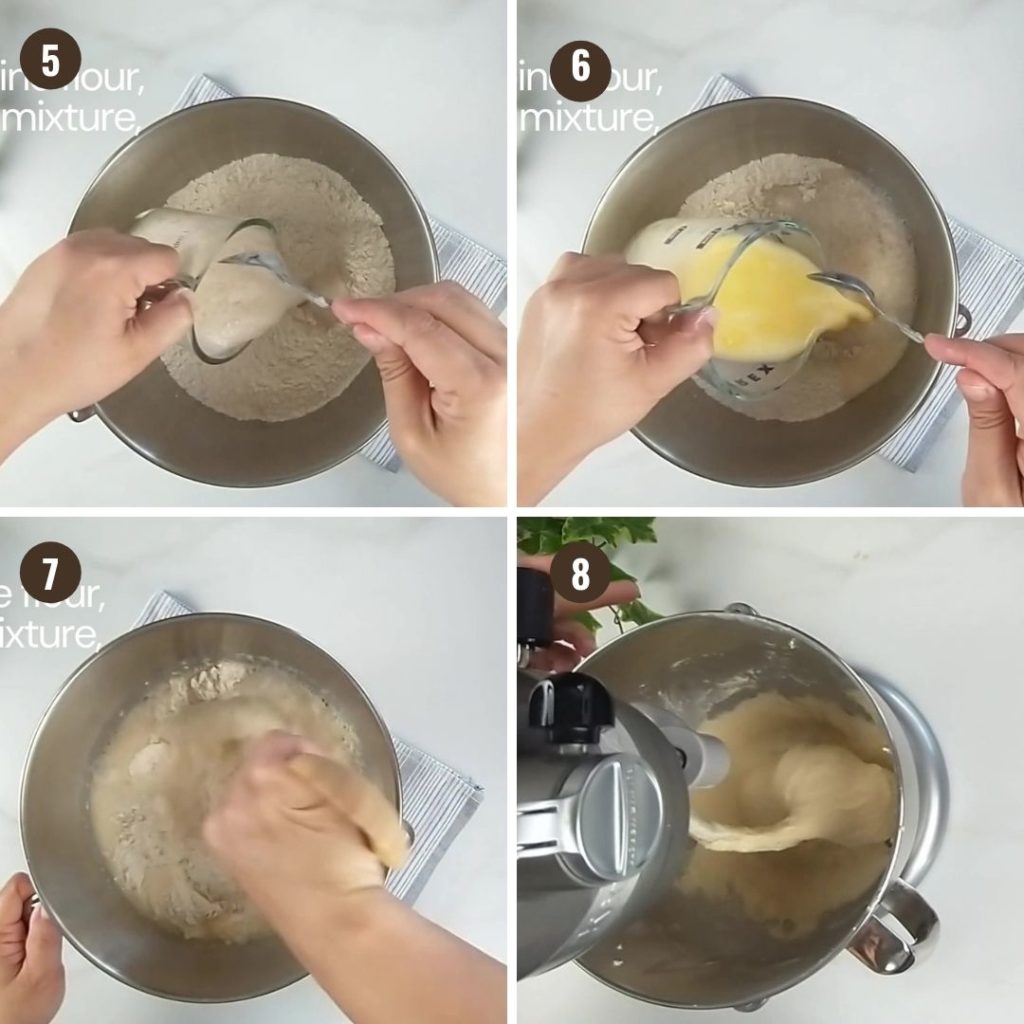
In a bowl, add dry ingredients - flour, remaining sugar, and salt. Mix the dry ingredients. Stir in milk mixture, and yeast mixture. With the back of a wooden spoon, combine all the ingredients.
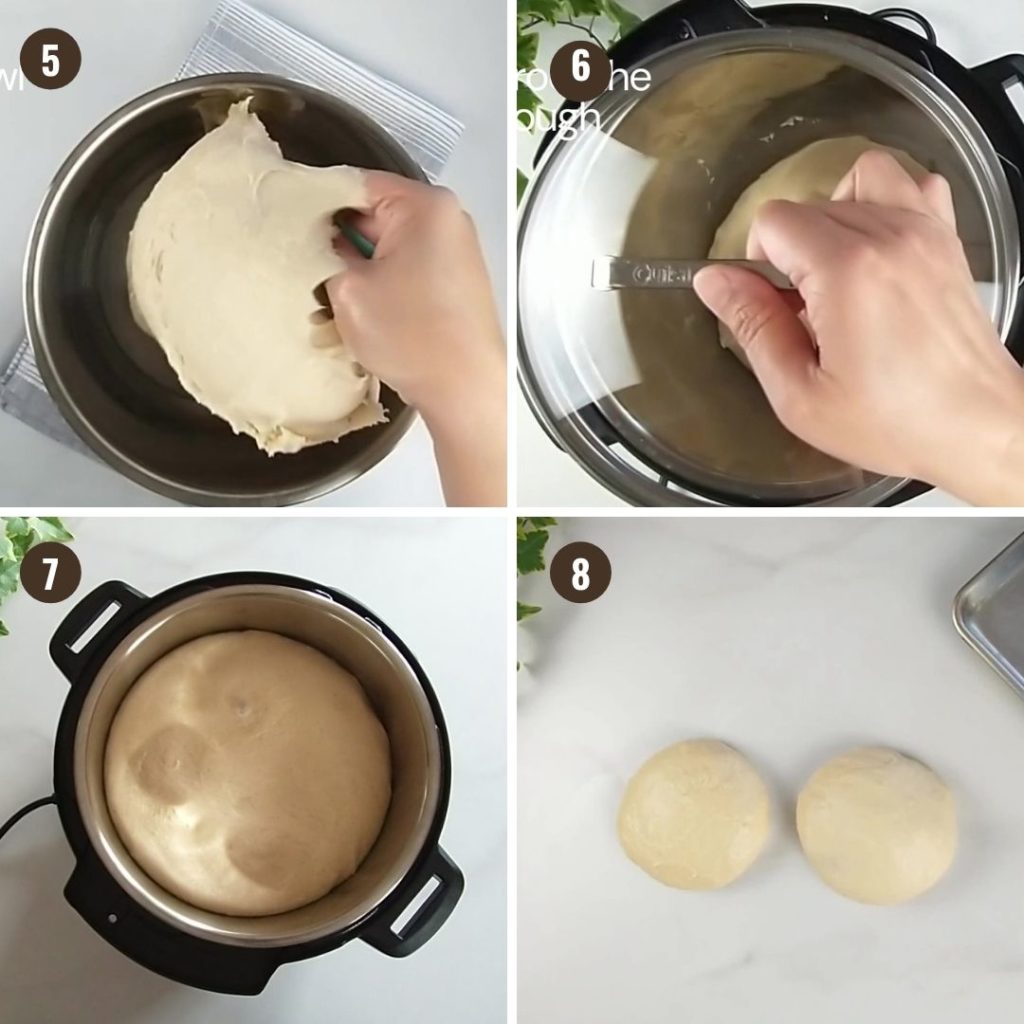
Transfer the dough to a lightly floured work surface. Knead the dough for around 8-10 minutes or the dough is soft, and smooth. Shape the dough into a ball.
Note: The dough will be slightly sticky, do not add too much flour.
If using a stand mixer, knead the dough for 5-7 minutes. The dough is soft and smooth (dough will start to leave the sides of the bowl ).
Step 3: First Proofing
Grease the bowl and place the dough in. Turn the dough to grease the top. Cover the bowl with a kitchen towel and place it in a warm place for 1-1 ½ hours, or it doubles in volume.
If using Instant Pot: Grease the inner pot. Place the dough, and turn the dough to grease the top. Place lid and cover the pot. Turn ON YOGURT (less) for 60 minutes.
Note: I used a glass lid that fits to cover the inner pot.
Step 4: Shape The Rolls
Grease a 13*18 inch baking sheet with some butter and set it aside.
Note: You can line the baking sheet with some parchment paper.
Transfer the dough onto a lightly floured work surface, and punch it down. Divide the dough into 2 equal portions. Shape each portion into a smooth ball.
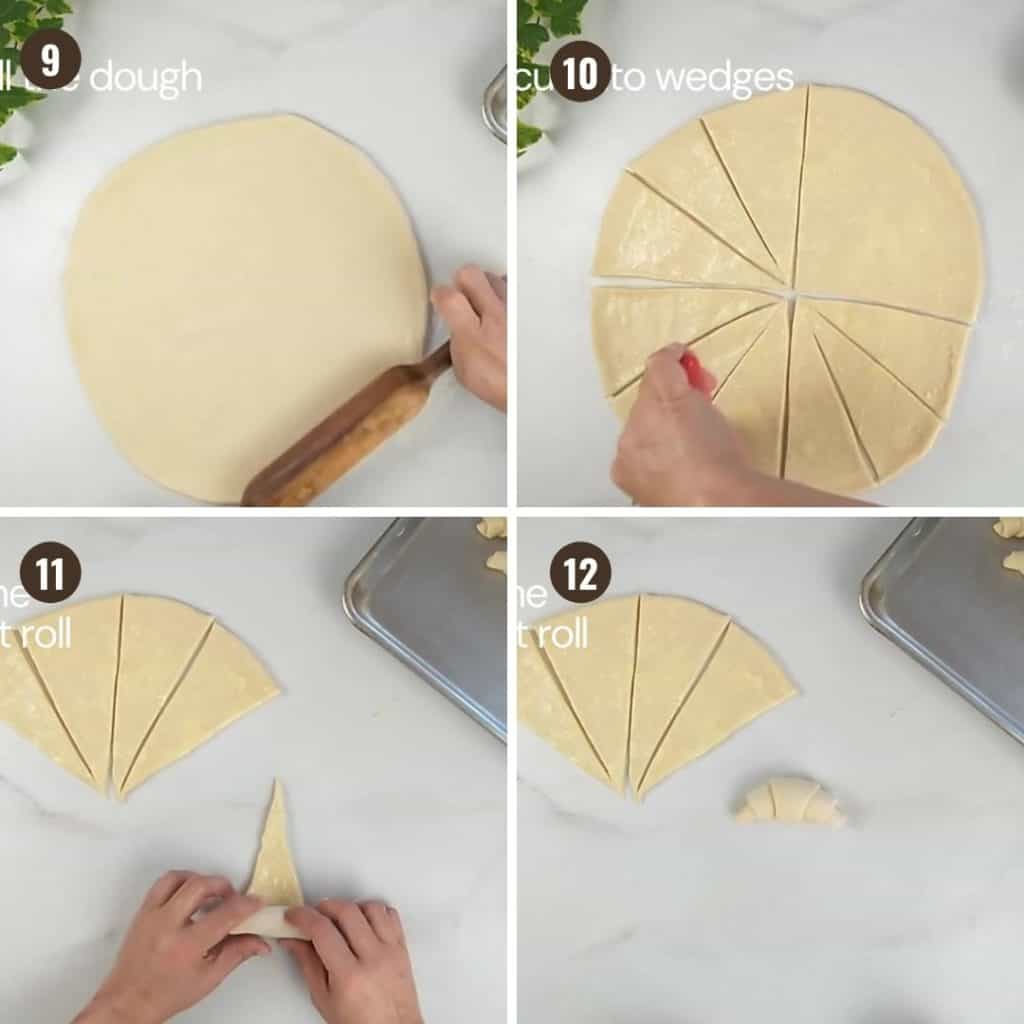
Take one portion of the dough ball and roll it into around a 16-17 inch circle. Try to roll it as even as possible.
Apply around 2 tablespoons of softened butter onto the circle.
Cut the circle, first into 4 wedges. Cut each wedge into 3 equal wedges. You will get 12 equal wedges from each circle.
Start with the wide end of each wedge (outside of the circle), and roll it towards the tip of the slice. Place the loose end of the roll onto the baking sheet. Repeat the process with the remaining wedges.
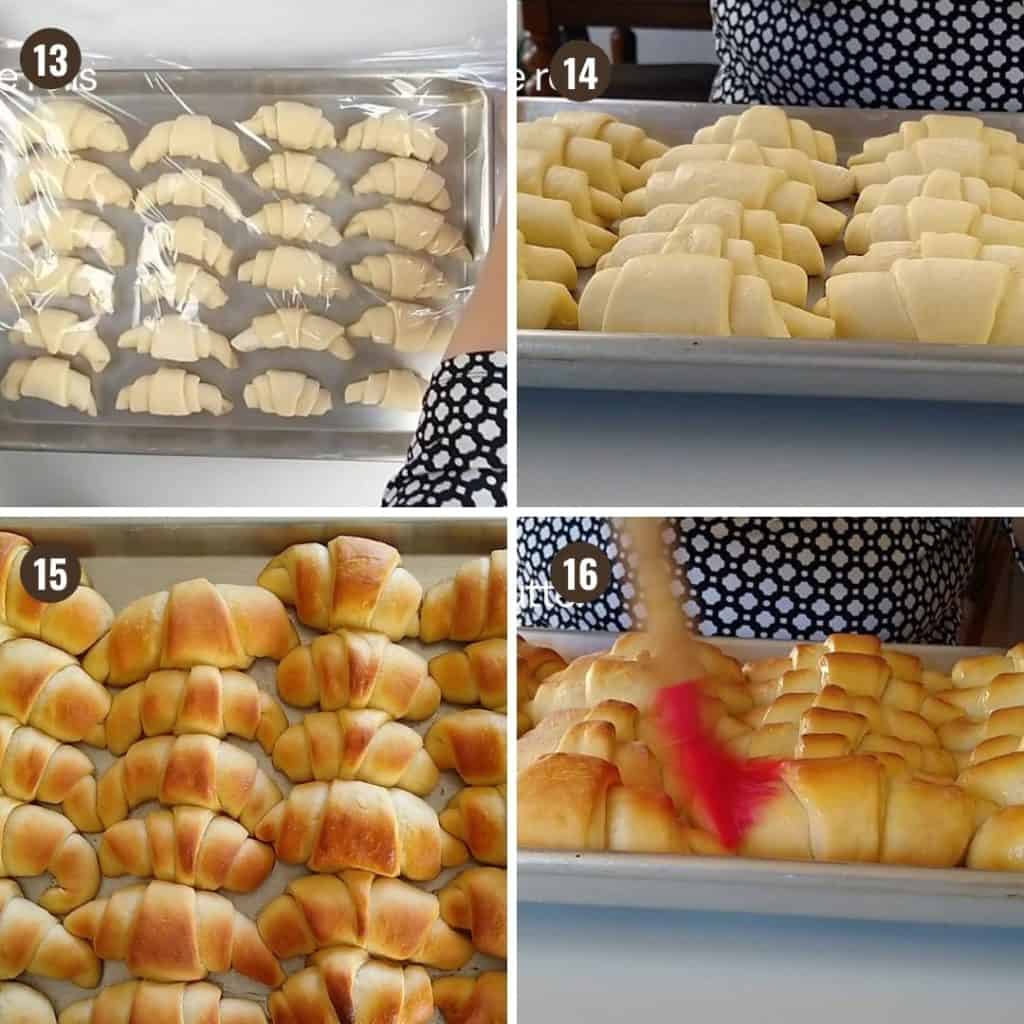
Repeat the process with the second portion of the dough. Roll into a 16-17 inch circle, and apply butter. Cut into 12 equal wedges, roll the wedges and place them onto the baking sheet.
Step 5: Second Proofing
Cover the crescent rolls loosely with some plastic wrap. Place them in a warm place or an oven with the oven light ON for 45-60 minutes, or the rolls have slightly puffed up.
Step 6: Bake
At the end of the second proofing, preheat the oven to 375*F.
Remove the plastic wrap. Bake the rolls for 14-18 minutes, or until golden brown.
Optional: Rotate the baking sheet halfway through for even baking.
Note: Place the baking sheet on the middle rack, to prevent the top from browning too fast. If the top of the rolls is browning quickly, loosely place a foil tent over the rolls.
Apply some melted butter on top, and enjoy warm, fluffy, crescent rolls!!
Directions For Make Ahead Dough
- Follow Step 1 & Step 2 and prepare the dough.
- Place the dough in a lightly greased, air-tight container and place it in the refrigerator. The dough will rise slowly overnight in the refrigerator.
- In the morning, remove the dough and let it sit at room temperature for around 30 minutes or it doubles in volume (first proofing).
- Continue with Step 4.
Directions To Freeze The Dough
- Follow the recipe through Step 3.
- After first proofing, deflate the dough. Wrap the dough first in a plastic wrap, followed by a foil. Place it in a freezer-safe, Ziploc bag and freeze it for up to 3 months.
- Thaw overnight in the refrigerator, or on a kitchen counter.
- Continue with Step 4.
Directions For Freezing The Rolls
- Follow the recipe through Step 4.
- Shape the rolls and arrange them on a lined baking sheet.
- Freeze the rolls uncovered, for 1-2 hours.
- Remove the rolls from the freezer, they will be frozen and not sticky anymore. Place the rolls in a freezer-friendly container or Ziploc bags. Freeze the rolls for up to 3 months.
- Thaw the rolls in the refrigerator or on the kitchen counter. Allow the rolls to come to room temperature.
- Arrange them on a greased baking sheet. Cover and allow them to rise for 45-60 minutes (second proofing).
- Continue with Step 6.
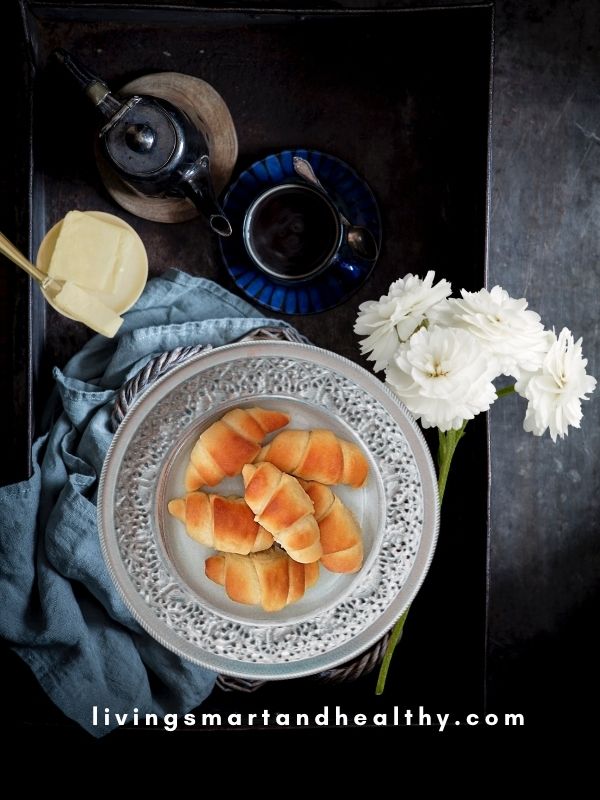
Pic Shown: Homemade Crescent Rolls
Tips For Best Dinner Rolls
The temperature of the water (or milk), must be warm enough to activate the yeast. The temperature should be around 100*F - 110*F. Anything hotter or cold will kill the yeast and the rolls won't rise.
The yeast must be active, or the rolls will turn quite hard. Make sure that the yeast has not expired. If the yeast is active, the mixture turns frothy and doubles in volume. If the mixture does not double in size, start the process again with fresh yeast.
Use room temperature softened butter. I prefer unsalted butter. Salted butter can be used too. Simply reduce the amount of salt in the recipe by ½ teaspoon.
Tips For The Dough
The crescent roll dough is soft, smooth, and will slightly be sticky. Do not add too much flour, it will make the rolls dense.
To measure the flour, you can use a scale or cup. If using cup measurements, do not scoop the flour into the cup. Lightly fill the measuring cup with the flour, and level it with the back of the spoon.
Do not over-knead the dough. A well-kneaded dough starts to leave the sides of the bowl. The dough should be soft, smooth, and slightly sticky.
To proof, the dough, place it in a warm place. Use Instant Pot or oven (with light ON only) for proofing. Do not put the dough in direct sunlight or an extremely warm place.
If using the oven to proof the dough, turn ON the oven light. Do not turn ON the oven.
Roll the dough into as much even thickness as possible, for evenly sized rolls.
Tips For Baking The Rolls
Grease the baking sheet or else the rolls might stick to the baking sheet.
Preheat the oven to 375*F. If the oven is not heated fully, chances are that the rolls might turn out flat or underbaked.
Place the baking sheet on the middle rack, to avoid browning of the top of the rolls. If the tops of the rolls are browning quickly, use a foil tent to loosely cover the rolls.
Rotate the baking sheet halfway through for an even baking.
It takes around 14-18 minutes for the rolls to bake. Do not over-bake the rolls, they will turn hard.
This recipe makes 24 large Crescent rolls. You can make 36 medium Crescent rolls with this recipe. To make medium size rolls, divide the dough into 3 equal parts. Roll each into a 13-14 inch circle, and cut into 12 equal wedges.
Pic Shown: Homemade Crescent Rolls
Frequently Asked Questions
Is crescent roll the same as croissants?
No, they both are not the same. Crescent rolls and croissants have the same shape. Croissants are made by the layering of dough and butter. The dough is folded several times for a richer, flakey pastry.
How are homemade crescent rolls better?
The store-bought crescent rolls are mostly dairy-free. Homemade rolls use dairy, milk, and butter, making them more rich and flavorful. Homemade crescent rolls are amazingly soft, with a perfect balance of sweetness and rich buttery flavor.
How to measure the flour, the right way?
It is important to measure the flour using the right method. To avoid over-measuring, do not scoop the flour straight from the container. First, loosen the flour by giving it a good stir with a spoon or a spatula. Next, spoon the flour into the measuring cup, and fill the cup slightly over the rim. Now, level the flour using the back of the spoon or a knife.
What is the consistency of the dough?
The consistency of the dough is soft, smooth, and slightly sticky. Do not add more flour. Excess flour will result in dense crescent rolls.
How long to knead the dough?
Depending upon the method used for kneading, the time will vary. If you are using a stand mixer to knead the dough, it takes somewhere from 5-7 minutes to knead the dough. If kneading the dough by hand, it takes around 10-15 minutes for a soft, smooth, slightly sticky dough.
How do you know if the dough is kneaded enough?
A well-kneaded dough will be soft, smooth, and slightly sticky. If the dough does not pass this simple test, it means it needs more kneading.
Here are a few ways you can tell that the dough is kneaded well:
First, it forms into a nice smooth dough, the dough will start to leave the sides of the bowl.
Second, do a windowpane test. Take a small piece of dough, and stretch it as thin as possible. If the dough does not tear, and you can see a thin layer of dough, it means the dough is kneaded well.
How To Store The Dinner Rolls
Cool crescent rolls completely. Place them in a Ziploc bag, or an air-tight container. Crescent rolls last for a few days at room temperature or up to a week in the refrigerator.
Crescent rolls freeze beautifully. Store the rolls in Ziploc bags or freezer-safe containers. Crescent rolls last for a couple of months.
Thaw the crescent rolls, brush or spray the rolls with some water and place them into a 350* F preheated oven for 5 minutes. Remove from the oven, brush with some melted butter and the rolls are ready to be served.
Pic Shown: Homemade Crescent Rolls
Enjoy Crescent Rolls With


Crescent Rolls Recipe | Homemade Dinner Rolls
Ingredients
Ingredients For Crescent Rolls Recipe
- 4 ½ cups (590 g) all-purpose flour, spoon & leveled
- 2 ¼ teaspoon (7 g) Active Dry Yeast
- ⅔ cup (157 ml) lukewarm water [100* F – 110* F]
- 1 cup (237 ml) whole milk
- ¾ cup (12 tablespoon) unsalted butter, softened
- ⅓ cup (67 g) granulated sugar
- 2 teaspoon salt
Instructions
How To Make Crescent Rolls
Step 1: Proof The Yeast
- In a cup, stir in lukewarm water [100*F – 110*F], 1 teaspoon sugar, and yeast. Let the mixture stand for 10 minutes, or it turns frothy and doubles in volume.Note: If the yeast is active, the mixture turns frothy, and doubles in volume. If the mixture does not double in size, start the process again with fresh yeast.
Step 2: Prepare The Dough
- In a microwave-safe bowl, warm cup of milk and 6 tablespoons of butter, or the butter just melts.Note: The temperature of the mixture should be lukewarm [100*F – 110*F].
- In a bowl, add dry ingredients – flour, remaining sugar, and salt. Mix the dry ingredients. Stir in milk mixture, and yeast mixture. With the back of a wooden spoon, combine all the ingredients.
- Transfer the dough to a lightly floured work surface. Knead the dough for around 8-10 minutes or the dough is soft, and smooth. Shape the dough into a ball.Note: The dough will be slightly sticky, do not add too much flour.
- If using a stand mixer, knead the dough for 5-7 minutes. The dough is soft and pliable (dough will start to leave the sides of the bowl ).
Step 3: First Proofing
- Grease the bowl and place the dough in. Turn the dough to grease the top. Cover the bowl with a kitchen towel and place it in a warm place for 1-1 ½ hours, or it doubles in volume.
- If using Instant Pot: Grease the inner pot. Place the dough, and turn the dough to grease the top. Place lid and cover the pot. Turn ON YOGURT (less) for 60 minutes.Note: I used a glass lid that fits to cover the inner pot.
Step 4: Shape The Rolls
- Grease a 13*18 inch baking sheet with some butter and set it aside.Note: You can line the baking sheet with some parchment paper.
- Transfer the dough onto a lightly floured work surface, and punch it down. Divide the dough into 2 equal portions. Shape each portion into a smooth ball.
- Take one portion of the dough ball and roll it into around a 16-17 inch circle. Try to roll it as even as possible.
- Apply around 2 tablespoons of softened butter onto the circle.
- Cut the circle, first into 4 wedges. Cut each wedge into 3 equal wedges. You will get 12 equal wedges from each circle.
- Start with the wide end of each wedge (outside of the circle), and roll it towards the tip of the slice. Place the loose end of the roll onto the baking sheet. Repeat the process with the remaining wedges.
- Repeat the process with the second portion of the dough. Roll into a 16-17 inch circle, and apply butter. Cut into 12 equal wedges, roll the wedges and place them onto the baking sheet.
Step 5: Second Proofing
- Cover the crescent rolls loosely with some plastic wrap. Place them in a warm place or an oven with the oven light ON for 45-60 minutes, or the rolls have slightly puffed up.
Step 6: Bake
- At the end of the second proofing, preheat the oven to 375*F.
- Remove the plastic wrap. Bake the rolls for 14-18 minutes, or until golden brown.Note: Place the baking sheet on the middle rack, to prevent the top from browning too fast. If the top of the rolls is browning quickly, loosely place a foil tent over the rolls.
- Optional: Rotate the baking sheet halfway through for even baking.
- Apply some melted butter on top, and enjoy warm, fluffy, crescent rolls!!
Video
Notes
- Directions For Make Ahead Dough
- Directions To Freeze The Dough
- Directions For Freezing The Rolls
- Tips For Best Dinner Rolls
- Frequently Asked Questions
- How To Store The Dinner Rolls
Nutrition
Disclaimer
Nutrition values are my best estimates. If you rely on them for your diet, use your preferred nutrition calculator.

Keri says
These crescent rolls were fantastic! Thank you for the great recipe.
Jyoti Behrani says
Great! I'm so glad you liked my recipe.
Kristen says
This was so easy! My kids loved it, thanks!
Jyoti Behrani says
Awesome! I'm so glad you liked my recipe.
Dannii says
These look so light and fluffy. I can't wait to try it.
Jyoti Behrani says
Great! Let me know how the crescent rolls turn out. Thanks!
Aparna says
So easy to make and they taste great. Thank you for the recipe!
Jyoti Behrani says
I'm so glad you liked my recipe 🙂
Anjali says
I had no idea it was so easy to make crescent rolls from scratch at home! This recipe turned out great and tasted even better than the store bought version!
Jyoti Behrani says
Awesome! So glad you liked my recipe. Thanks for sharing your feedback!