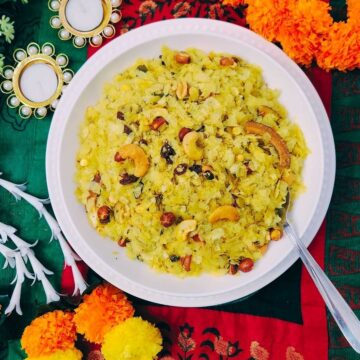
Poha Chivda | Chivda Recipe 2 Ways | Namkeen Snack
Try this delicious Roasted Poha Chivda, a crispy and flavorful Indian snack perfect for tea time! Enjoy the crunchy goodness with a blend of spices.
Equipment
Ingredients
- 6 cup thin poha ;thin flattened rice
- ¼ cup peanuts
- 2 tablespoons raisins
- ¼ cup dalia ;split roasted chana daal
- ¼ cup dry thin sliced coconut
- 1 tablespoon powdered sugar; adjust to taste
- ¼ teaspoon citric acid powder or amchur powder; adjust to taste
- ¼ cup unsalted cashews ;optional
- 2 tablespoon oil
- salt to taste
- For Tadka
- 2 tablespoon oil
- 1 tablespoon fennel seeds
- 1 tablespoon sesame seeds
- 3-4 green chili, finely chopped ; adjust to taste
- 1-2 sprig curry leaves (about 12-15 leaves)
- 1 teaspoon ground turmeric
Instructions
Pan Roasted Poha Chivda
- Start by roasting the poha. In a large pan, dry roast the poha over low heat until it becomes crispy. Be careful not to over-roast, or it will become too hard. Set aside.
- In the same pan, heat oil over medium heat. Add the raisins and fry for a minute or until the raisins swell up. Remove them on a paper towel and set aside.
- Add the peanuts and roast them until they become slightly brown. Remove them on a paper towel and set aside.
- If you're using mixed nuts (cashews, almonds), add them at this stage and roast them until they become slightly brown. Remove them on a paper towel and set aside.
- In the same pan, add oil and heat it over medium heat. Add fennel seeds and sesame seeds and let them splutter.
- Next, add the chopped green chilies and curry leaves. Sauté them for a minute or two.
- Add the roasted chana dal and dry sliced coconut, and continue to roast for a few more minutes.
- Reduce the heat to low and add turmeric powder, citric acid powder, salt, and sugar. Mix well.
- Add the roasted peanuts, raisins, dry coconut, and roasted poha to the pan and gently mix everything together. Keep stirring for a few minutes until the poha is well coated with the spices.
- Remove the chivda from the heat and let it cool completely. It will become crispier as it cools down.
- Once the Roasted Poha Chivda is cool, store it in an airtight container. It can be kept for a few weeks if stored properly.
- Enjoy your homemade Roasted Poha Chivda as a delicious, crunchy snack with a cup of tea or as an accompaniment to other dishes. You can adjust the spice level and ingredients to suit your taste.
Oven Roasted Poha Chivda
- Oven-roasted poha chivda is a healthier alternative to the traditional version, as it requires less oil and still results in a crispy and flavorful snack. Here's a recipe for making oven-roasted poha chivda:
- Preheat your oven to 350°F (190°C).
- Start by roasting the poha. Spread the poha in a single layer on a baking sheet. Place it in the preheated oven and roast for about 10-15 minutes, or until it becomes crispy and slightly golden. Stir the poha every 5 minutes for even roasting. Keep a close eye on it to prevent browning. The exact time may vary depending on your oven, so check it every 5 minutes or so.
- Once the poha is roasted, set it aside. Now, spread the peanuts, and nuts if using (peanuts, cashews, almonds, dry sliced coconut) in a single layer on a baking sheet and roast for 8-10 minutes. Keep an eye to prevent nuts from over-browning.
- While the poha is roasting in the oven, you can prepare the seasoning. In a pan, heat oil over medium heat. Add the raisins and fry for a minute or until the raisins swell up. Remove them on a paper towel and set aside.
- In the same oil, add fennel seeds and sesame seeds and let them splutter.
- Next, add the chopped green chilies and curry leaves. Sauté them for a minute or two.
- Reduce the heat to low and add turmeric powder, citric acid powder, salt, and sugar. Mix well.
- Add the oven-roasted poha and oven-roasted nuts to the pan and gently mix everything. Keep stirring for a few minutes until the poha is well coated with the spices.
- Remove the chivda from the heat and let it cool completely. It will become crispier as it cools down.
- Let the mixture cool down completely before storing it in an airtight container. The chivda will become crispier as it cools.
Notes
Please refer to the post for the following:
- Tips
- FAQ's
Disclaimer
Nutrition values are my best estimates. If you rely on them for your diet, use your preferred nutrition calculator.
Tried this recipe?Mention @livingsmartandhealthy or tag #livingsmartandhealthy
Follow Me On PinterestFollow @livingsmartandhealthy!